Do you offer a pro discount?
Snowmetrics gets requests for “professional discounts” on a regular basis. We are a very small business. We care deeply about good science, education, safe mountain travel and we are huge advocates for people to “mess with the snow” as much as possible. We make our equipment available to our customers at the most affordable prices possible. We have a very small profit margin. Some of our items cost us the same amount we charge you. We are not like big outdoor labels that make much more in a day than we do in 10 years. People have suggested that we raise our prices and then offer a professional discount. We feel this would be disingenuous and that fact is that we really only sell to professionals. It would also increase our workload and complicate our lives – two things we really want to avoid.
We have been in the business for 30 years (started in 1985) and have yet to make any money. We keep doing this because we love snow, snow research and education, and we know that there is a need for equipment that works well and lasts.
Can I measure snow density using a snowmetrics snowboard SWE sampler?
We are often asked how to calculate snow density from our snow board sampler.
This is very simple to do. If you measure depth (D) in cm and SWE in mm, just change depth units to mm, and divide SWE by D. This gives mean layer density.
density = ρ
snow water equivalence = SWE
depth = D
ρ = (SWE/D)x100 to get PERCENT DENSITY
For example:
D = 10 cm (100 mm)
SWE = 10 mm
ρ = (10/100)x100 = 10%, and since we use metric this is just 10% of water, or 0.10×1000 kg/m3 = 100 kg/m3 (relatively heavy powder in this part of the world)
D = 15 cm (150 mm)
SWE = 12 mm
ρ = (12/150)x100 = 8%, and 0.08×1000 kg/m3 = 80 kg/m3 (still a little heavy for fresh snow here in Colorado)
D = 28.2 cm (282 mm)
SWE = 11
ρ = (11/282)x100 = 3.9% and 0.039×1000 kg/m3 = 39 kg/m3 (nice light powder anywhere)
3.9% snow would be 39 kg/m3 or 0.039 g/cm3
10% snow would be 100 kg/m3 or 0.01 g/cm3
NOTE! The tube and scale are matched. The important part is the cross sectional area of the tube, as that is how the gram conversion is calculated into water equivalence. The scale will not work with any other tube or volume unless you recalibrate and convert, which would be tedious. This is not designed to make this exclusive, but to make it easy since all the work to get SWE is already done.
Can I use the snowboard tube sampler to get snowpack SWE and density?
The short answer is yes, but it works well in some situations and not so well in others. The tube is plastic and deforms under pressure, which can change the cross-sectional area and therefore compromise the accuracy. The tube is also not as strong as steel. These two factors suggest that this might not be the best tool in snowpacks that are dense, cohesive, or have strong crusts or ices lenses present. Strong, abrasive snow will also peel the label off of the tube rendering it useless after time.
In low density, poorly bonded snow layers the SWE tube may work very well. In these conditions you need to adjust your technique to be sure that you collect an accurate sample. You can quickly profile density and SWE by using the tube in a vertical orientation and in doing so, you can sample up to 30 cm of snow at a time. Note that deep snowpacks often have dense layers due to settlement and bonding, so deep snowpacks tend to destroy the tube after much use.
Shallow, weak snowpacks of up to about 60-70 cm can be effectively sampled with care. Start from the top, take increments from the top to the bottom, recording the top and bottom depth, and the SWE of each increment. Isolate the bottom of each layer by sliding the putty knife in at the desired height before inserting the tube. You can get total SWE by summing the increments and you can get layer densities by dividing the layer SWE by the layer thickness as explained elsewhere.
If you want a good, long-lasting, accurate tool for measuring snow density, look at our density samplers – RIP I and RIP II.
Should I use a digital or a dial stem thermometer?
There are pros and cons to both. The most important thing is to get a good quality thermometer. The next most important thing is to get a thermometer with a face or display that is readable in poor conditions or low light. 1” dial stems are very hard to read and small digital displays are problematic too.
Almost all of the high-quality thermometers are only accurate to plus or minus 1o C. Repeatability or precision is often 1o C. Resolution is usually 1o C on dial stems and 0.1oC on digital thermometers. Don’t be fooled by claims of accuracy that are really resolution.
Just because the display reads tents of degrees, does not mean the thermometer is accurate enough to provide that information. If the thermometer is only accurate to 1o C, then the tenths are meaningless. Likewise, reading a dial stem thermometer to the nearest ½ degrees when the accuracy is only 1o C is meaningless.
For a great deal more money, one can purchase digital thermometers that are accurate to 0.1o C, but contact problems in the porous matrix of snowpacks reduces their utility. For most applications, 1o C accuracy is adequate.
With thermometers, you really get what you pay for. I generally prefer the large dial stem thermometers, because they can be calibrated and adjusted in the field and they are not dependent on batteries. If you are digitally oriented, we have found a high-quality digital as well. Many of the 1” dial stem and inexpensive digital thermometers available in snow study kits are only accurate to plus or minus 2o C, but this is seldom advertised. Ask before you buy.
You carry two different styles of snow depth probes. What’s the difference?
They are very different in reality and serve very different purposes.
The avalanche probe is a rescue tool. It is one of the three essential items everyone should carry and know how to use. It is designed to be lightweight so you will carry it with you. Avalanche probes are also designed to deploy very quickly as time is the most critical factor when someone is buried. Finally, they are designed for a maximum depth of less than three meters, because few people are ever recovered alive at depth greater than a couple of meters.
These factors all make for an excellent avalanche probe, but do not make for a robust probe that will withstand years of use measuring snow depths ranging from 0 m to more than 13 m.
Our snow hydrology probes are designed for long-term use with repeated measurements in deep, dense snowpacks. They are available in 1 m sections that can be connected to any length you choose. A practical upper limit is about 13 m because the friction becomes too great to measure greater depth. They are made of strong anodized aluminum with stainless steel joints that will withstand years of use. Although they would work fine for locating a buried person, they are not quick to assemble and they are not lightweight when compared to avalanche probes, and should not be used for this purpose.
Why does your crystal card have so little information printed on it?
We designed our own crystal card with very specific details in mind. A card with volumes of material printed on it defeats the purpose of a crystal card – to look at snow crystals! We print on size of grid on one half of the card. That way, if you shoot photos with card as a background, you will always know what the actual scale is.
When a card has a 1, 2, and 3 mm grids on it, you never know just looking at the final picture what grid size you are looking at so you don’t know how big the crystals are. We leave one half of the card with no grid because some people use lupes or pocket microscopes that have graduated reticules and some people prefer no grid at all.
Screen printed information also scrapes off with a little use so we laser etch our graphics on our cards for the long life you get out of all snowmetrics products.
Why don’t you have metal crystal cards?
Metal is a very efficient heat conductor. Warm hands, even with gloves covering them, heat up metal crystal cards and change the crystals even as you are looking at them. Ideally a crystal card would be like good insulation and transmit very little heat. Unfortunately, they also have to be strong, so plastic is a good compromise.
We use a plastic that is better than metal in terms of thermodynamic properties, but we chose it mainly for its unbelievable optical properties. Try one – you will be amazed at how different snow crystals look.
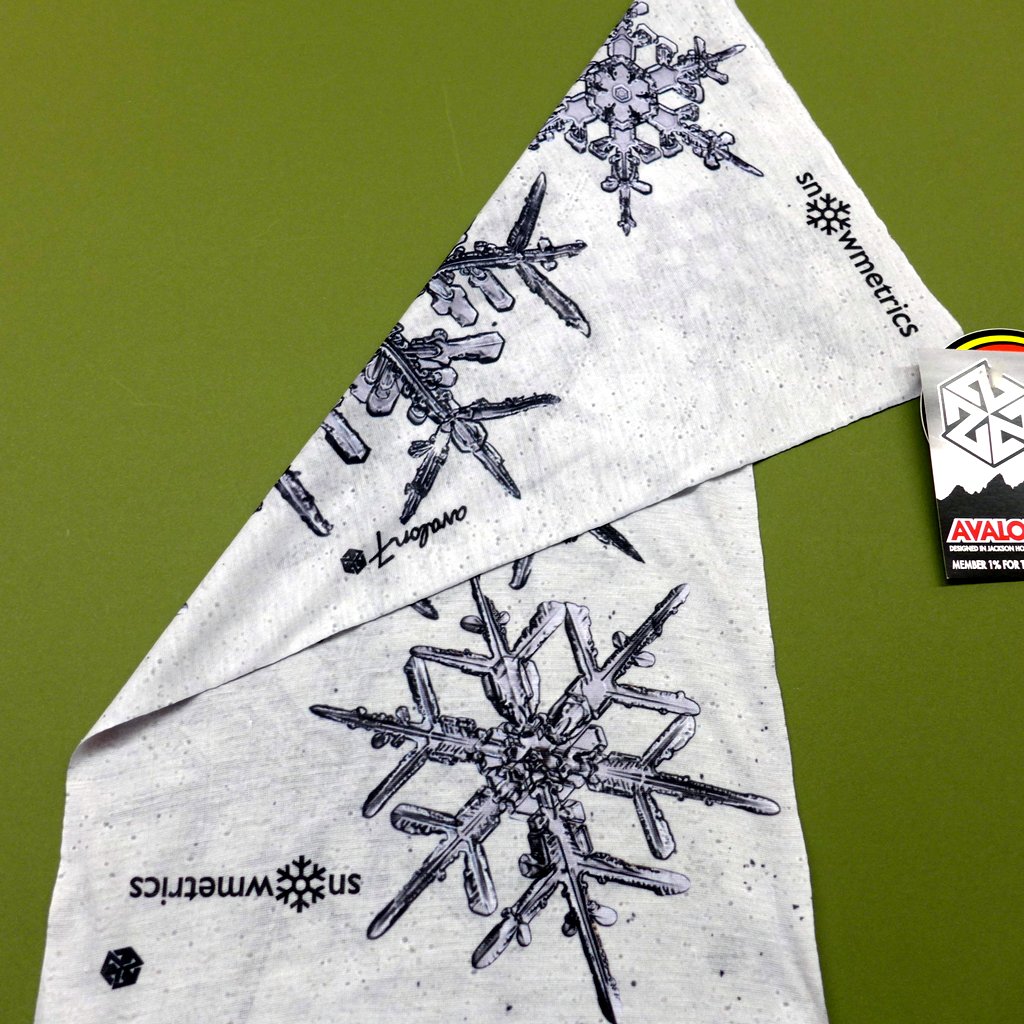
The snowboard sampler has English and metric scales – explain, please.
We have users that have a strong preference in both directions. Many avalanche forecasting operations in the U.S. use the English system, as well as CoCoRAHS and National Weather Service observers. Many Canadian, European, and other non-U.S. users prefer the metric system, and scientists generally use the metric system since all their other measurements are in S.I. It is too expensive to make two different tubes and two different graduations, one with English and one with metric units. To keep costs down, we combine them and let the users choose.
The danger is that an unfamiliar user chooses the wrong graduation and/or combines them, depth in metric and SWE in English, or vice versa. Clearly, this will give bogus data. We strongly recommend that you remove or hide the graduations that you will not use. A Sharpie or other permanent marker is all you need. Just draw a line down the graduations or over the numbers on the unused side of the scale and tube. Alternatively, a piece of opaque tape on the scale will remove the confusion. We do not recommend adding tape to the tube as it will add weight and probably come off with repeated use. You can also carefully scrape the numbers off the tube from the side of the tube or scale that you do not use.
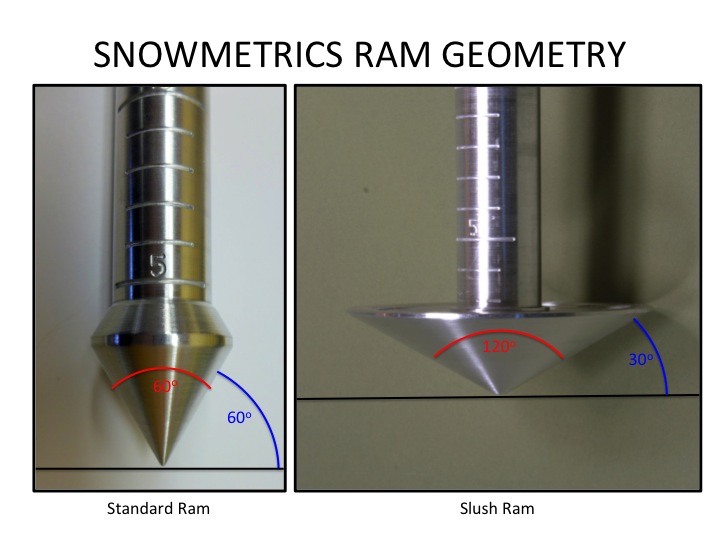
What is the actual geometry of the Ram Penetrometer tip cones?
Can you hang the Snow Study Kit from a pit wall?
I like to dig a cubby hole in the pit flank and stick my stuff in it, out of the way and out of the weather. When the weather is bad, it protects it, and when it is warm out, it keeps it cool.
Our Tool Taco does not currently have a tab to hang it. I am not sure it would work well for hanging since it opens like a book. If you sewed a loop on it and hung it from the end, I think it would dump your equipment. If you put a tab on the upper right corner it would probably hang fine. Maybe we will add this feature.
I have 1″ dial stem thermometer – why should I use yours?
The 1″ dials work just fine, if you are happy with yours, keep it. However, they are hard to read in low light or bad weather. Ours have a 1 3/4″ face which makes it easier to read. We don’t recommend the large dials in soft kits like the Taco or BCA bag because they are big and get tweaked, which throws them out of calibration. I finally found a digital thermometer that I like after trying many and we offer those in our Snow Study Kits. I still carry dial stem thermometers with me too, to circumvent battery issues. I keep the dial stems in our aluminum thermometer case.
Folding rule – Why do you need this if you have a marked probe?
I like the folding rule because it barely sticks up above the pit edge. I do a lot of pits in really poor conditions and the probes blow around and don’t stay on the wall. Even pinning the probe against the wall with sticks, snow or other objects works poorly in significant winds. I also get tired of lining up all the marked sections to read them easily. I do use a probe for 3-7m deep pits, but for these deep pits, I use our 1 m sectional probes, not avalanche probes.
3 m tape – Why carry a tape measure too?
Some people like folding rules, some people like tapes. It’s largely a matter of personal preference. I often use the 3 m tape when my pit is between 2 and 3 meters deep.
Which magnifying loupe is the best?
The Lumiloupe 10x is probably the best for general use. The 15x seems to be very popular too. Both work well for photos with iPhones or point-and-shoot cameras. If you can afford it, the microscope 25A will allow you to look at snow like you have never seen it before. It truly is a night and day difference. If you care for it, it will last a long time and I think it is one of the best investments I have ever made. It will change the way you look at and understand grains and bonds and stratigraphy in general.
What is the benefit of the Suunto clinometer?
The Suunto percent/degree clinometer is very accurate and easy to use. You carry it on a string around your neck, so it is always accessible. It allows you to shoot slope angles (up or down slope) easily, quickly, and accurately. They are pricey but I have had the same one for over 25 years, so not a bad investment.
How are your field books different from the pre formatted ones offered by other suppliers?
Our field books have lines and grids on the pages (see photo), but no other writing. If you want a formatted one, check out the options elsewhere. If you like to organize your own, the blank option we offer is probably best.
Why carry a paint brush?
This is a personal preference issue. I carry one, but don’t always use it. It depends on the snow, the purpose of the pit, time, etc. I also carry a big old heavy drywall brush when I am teaching classes and I love it, but I don’t carry it in the backcountry. Brushing is subjective, you’ll get layers where you want them, rather than where they exist, if you aren’t careful.